Rufus stands as a powerful, free tool for crafting bootable USB drives, widely used for installing Windows, Linux, or diagnostic utilities. Its lightweight design and versatility make it a favorite among tech enthusiasts and IT professionals. However, users occasionally encounter errors during the process, which can disrupt creating bootable media for operating systems or recovery tools, causing frustration and delays in critical tasks.
These errors often stem from issues like incompatible ISOs, USB drive problems, or incorrect settings in Rufus. From “Access Denied” messages to formatting failures, understanding the root causes is key to resolving them. Fortunately, most Rufus errors are fixable with straightforward troubleshooting steps, ensuring users can create reliable bootable USBs for Windows, Linux, or other systems without hassle.
This guide provides a comprehensive roadmap to diagnose and fix common Rufus errors. Covering everything from USB preparation to advanced settings, it equips users with practical solutions to ensure smooth operation. Whether a beginner or an experienced user, this article helps navigate challenges, making bootable USB creation seamless and efficient across platforms.
Identifying Common Rufus Errors
Access Denied Errors
Access Denied errors occur when Rufus lacks sufficient permissions to write to the USB drive. This often happens if the drive is locked, in use by another program, or if Rufus isn’t running with administrator privileges. To resolve, ensure Rufus runs as an administrator by right-clicking its executable and selecting the appropriate option. Check if the USB is write-protected or being accessed by other software. Closing conflicting programs or removing write protection typically fixes this issue quickly.
ISO File Not Recognized
Rufus may fail to recognize an ISO file if it’s corrupted, incomplete, or incompatible. This error appears when selecting the ISO, halting the process. Verify the ISO’s integrity by checking its checksum (MD5 or SHA) against the source’s provided value. Redownload the file from a trusted source if mismatches occur. Ensure the ISO matches the intended OS version, as outdated or modified ISOs can cause recognition issues during USB creation.
USB Device Not Detected
If Rufus doesn’t detect the USB drive, the issue may lie with the drive or system configuration. This error prevents users from selecting the target device. Check the USB connection, try a different port, or test another drive. Ensure the drive isn’t hidden by system policies or locked by antivirus software. Updating USB drivers or restarting the system can also help Rufus recognize the device properly.
Troubleshooting USB Drive Issues
Checking USB Drive Health
A faulty USB drive can cause errors like write failures or incomplete formatting. Use Rufus’s bad block check to scan for defective sectors before creating bootable media. Common USB issues include:
- Corrupted file systems preventing writes
- Physical damage to the drive
- Insufficient storage capacity
- Incompatible USB versions (e.g., USB 2.0 vs. 3.0)
- Residual data causing conflicts If bad blocks are detected, replace the drive to avoid persistent errors during USB creation.
Resolving Write Protection
Write-protected USB drives block Rufus from formatting or writing data, triggering errors. Check for a physical write-protection switch on the drive and toggle it off. If no switch exists, use Windows Disk Management or a Linux terminal to remove software-based write protection. Alternatively, use Rufus’s formatting options to erase the drive, ensuring it’s not locked by another process or system policy.
Ensuring Proper USB Connection
Loose or faulty USB connections can interrupt Rufus’s operations, causing detection or write errors. Ensure the USB is securely plugged into a functional port. Avoid using USB hubs, as they may reduce power or cause connectivity issues. Test the drive on another computer to rule out port-specific problems. Using a high-quality USB drive and direct connection improves reliability during bootable media creation.
Fixing ISO and File System Errors
Verifying ISO Integrity
Corrupted or mismatched ISO files often cause Rufus to fail during USB creation. Download ISOs from official sources like Microsoft or Linux repositories to ensure reliability. Use tools like HashCalc to verify the ISO’s checksum matches the provider’s. If errors persist, try a different ISO version or source. Ensure the ISO is compatible with the target system’s architecture (e.g., 32-bit or 64-bit) to prevent compatibility issues.
Choosing the Correct File System
Rufus errors can arise from selecting an incompatible file system, such as FAT32 for large ISOs or NTFS for UEFI systems. Choose NTFS for Windows installations or exFAT for cross-platform compatibility. For Linux, FAT32 or ext4 may be required depending on the distro. Adjust the file system in Rufus’s settings to match the ISO and target system requirements, avoiding formatting errors during the process.
Handling Large ISO Files
Large ISO files, such as those for Windows 11, may trigger errors if the USB lacks sufficient space or if FAT32 is used (limited to 4GB files). Use NTFS or exFAT for ISOs exceeding 4GB. Ensure the USB has enough capacity, typically 8GB or more for modern OS installations. Clear residual data from the drive using Rufus’s full format option to prevent space-related errors during creation.
Configuring Rufus Settings Correctly
Selecting Proper Partition Schemes
Incorrect partition schemes (MBR vs. GPT) cause boot failures or errors in Rufus. Choose MBR for legacy BIOS systems or GPT for UEFI-based hardware. Common configuration tips include:
- Verify system firmware (BIOS/UEFI) before selecting
- Use GPT for modern Windows and Linux installs
- Select MBR for older systems or compatibility
- Enable secure boot compatibility for UEFI
- Check target system requirements in advance Adjusting these settings in Rufus prevents errors during USB creation.
Adjusting Bootloader Options
Rufus errors may occur if the bootloader settings don’t match the ISO or system. For Windows, ensure the correct bootloader (e.g., UEFI or BIOS) is selected. For Linux, choose Syslinux or GRUB based on the distro’s requirements. If errors persist, enable Rufus’s advanced options to customize bootloader parameters, ensuring compatibility with the target system and avoiding boot-related issues during USB preparation.
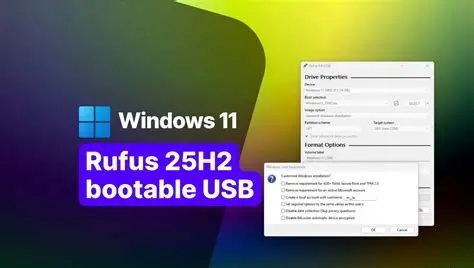
Enabling Advanced Options
Rufus’s advanced settings can resolve complex errors by allowing fine-tuned configurations. Access these by clicking the arrow next to “Show advanced format options.” Adjust cluster sizes, enable bad block checks, or disable quick format for thorough preparation. These settings help troubleshoot persistent errors, especially for non-standard ISOs or older hardware, ensuring the USB is correctly configured for booting.
Resolving System and Software Conflicts
Disabling Antivirus Interference
Antivirus software can block Rufus’s access to USB drives, causing errors like “Device in Use” or “Access Denied.” Temporarily disable antivirus programs or add Rufus as an exception in their settings. Common conflicts arise from:
- Real-time scanning locking the USB
- Security policies restricting disk writes
- Firewall blocking Rufus’s operations
- Background processes accessing the drive
- Overzealous system protection tools Restart Rufus after disabling antivirus to ensure smooth operation.
Closing Conflicting Applications
Other programs accessing the USB, such as file explorers or backup tools, can cause Rufus errors. Use Task Manager (Windows) or System Monitor (Linux via Wine) to identify and close applications using the drive. Unmount the USB in the operating system before running Rufus. If errors persist, reboot the system to clear residual processes, ensuring Rufus has exclusive access to the USB drive.
Updating System Drivers
Outdated USB or storage drivers can prevent Rufus from detecting or writing to the drive. Update drivers via Windows Device Manager or Linux package managers. Check for motherboard or chipset updates, as these impact USB functionality. Restart the system after updates to ensure compatibility. Using the latest drivers minimizes errors and improves Rufus’s performance during bootable USB creation.
Advanced Troubleshooting and Community Support
Checking Rufus Logs
Rufus provides detailed logs to diagnose errors, accessible via the “Log” button in its interface. Review logs to identify specific issues, such as failed writes or ISO mismatches. Save logs for reference when seeking help online. These logs pinpoint error codes or processes, helping users or support communities suggest precise fixes for complex issues during USB creation.
Updating Rufus to the Latest Version
Using an outdated Rufus version can cause compatibility errors with new ISOs or hardware. Download the latest version from the official Rufus website (rufus.ie). Updates often fix bugs and add support for newer OS versions or UEFI systems. Ensure the downloaded file is from a trusted source to avoid malware, and run it as an administrator to prevent permission errors.
Leveraging Community Resources
Rufus’s open-source community offers extensive support through forums, GitHub, and tech blogs. Search for error codes or descriptions on platforms like Reddit or Stack Exchange. Post detailed queries with log files for tailored advice. The community often shares workarounds for niche issues, such as specific hardware incompatibilities or rare ISO errors, helping users resolve problems efficiently.
Conclusion
Fixing Rufus errors when creating bootable USBs involves identifying issues like access denials, ISO mismatches, or USB faults and applying targeted solutions. From verifying ISO integrity to adjusting partition schemes, this guide empowers users to troubleshoot effectively. Leveraging Rufus’s logs, updating software, and tapping community resources ensure smooth USB creation for Windows and Linux.